UI Prototyping
UI Prototyping with SVG and Javascript
Ever needed to bring user interface (UI) design to prototype quickly for concept validation? At CoRoLa, many of our demonstrators have some kind of screen based UI. Over the last years we tested several ways of creating these UIs and developed a process using vector graphics (SVG) and anime.js to quickly obtain testable results.
Our Problem
Smartphones brought huge expectations regarding UI design and overall user experience. Since then, it became standard to
- have minimalistic designs,
- adapt to all kind of screen sizes
- and be responsive and intuitive
For our Connected Cars - Convoi Demonstrator we followed that dogma and implemented the UI using React. Altough this gave us the freedom to implement whatever design we could think of, it took considerable time. Additionally, the design was made with a UI prototyping tool, but we had no means to reuse anything from this tool except the graphics. Hence, the overall layout had to be recreated manually in HTML/CSS by us.
In future projects, we also found it beneficial for the workflow of our team to split the design part from the implementation part. Being able to iterate quickly between the design process and the implementation of it was another reason why we were looking for alternatives. Though there are tools like Figma and Open Source alternatives, they did not solved the basic problem we had.
Our Solution
Several observations in the past led to our solution.
Reduce complexity
After the "Connected Cars - Convoi" demonstrator and our exhibit "Data - Fuel for AI" we realized, that the UX has to be greatly reduced. We tried to tell a story with both projects. Users had to go through multiple steps with different screens, tasks, information and options. This approach has its advantages, e.g. providing a rationale and lead people from their current point of view. But it reduced, however, the responsiveness of the experience and users got impatient or frustrated with the experience.
Therefore, in our newest projects, we went for single-shot designs:
- Provide input, e.g. choose options, tweak and interact with the system.
- Press Start.
- See Result.
- Repeat.
Reduce flexibility
Our projects are usually one-offs, prototypes, unique (except our robotic airhockey). Therefore, we know exactly on which hardware it will run, especially the screen size and resolution. We have no need for a flexible, grid based layout and therefore can reduce our development efforts.
SVG and anime.js
Our experience from past projects led to the idea to animate SVGs. We already used them in the past in the design process or for non-functional mock-ups. They can be made and edited without a line of code and easily be shared with non-technical people.
Using the javascript animation library anime.js, only relevant elements can be modified, animated or turned into a button. This process has the following advantages for our team
- From UI Draft to final implementation, the same vector graphics file is used.
- Implementation can be done gradually, focussing on the most importing elements first.
- As a side-effect, we devised single-page designs which improve the overview a user has (i.e. build dashboards).
- Design and Implementation can be split between two people and can iterate quickly over user feedback.
- Layout and graphics are done once, avoiding to do any work twice.
Limitations
Of course this method comes at a cost.
Single window
Animating a SVG makes multi-page or multi-view UIs unrealistic. It's possible to load another SVG, or draw a submenu on the main page. But would increase the complexity of the approach, which we try to avoid. When using this method, think "Dashboard".
Fixed Size
A vector graphic works with pixel positions. There is no resizing or stretching. If you plan to deploy this interface on displays with different ratios, you might have problems. However, for animations, e.g. moving one element to another position on the canvas you can use invisible elements as targets and therefore don't have to consider any absolute values during the implementation.
Example
We implemented a thin wrapper around anime.js, which allows to quickly apply common animations like changing visibility, moving an object along a path or changing its color. The full example can be downloaded from github
The image is drawn in Inkscape, giving the important elements specific IDs via the Inkscape XML editor.
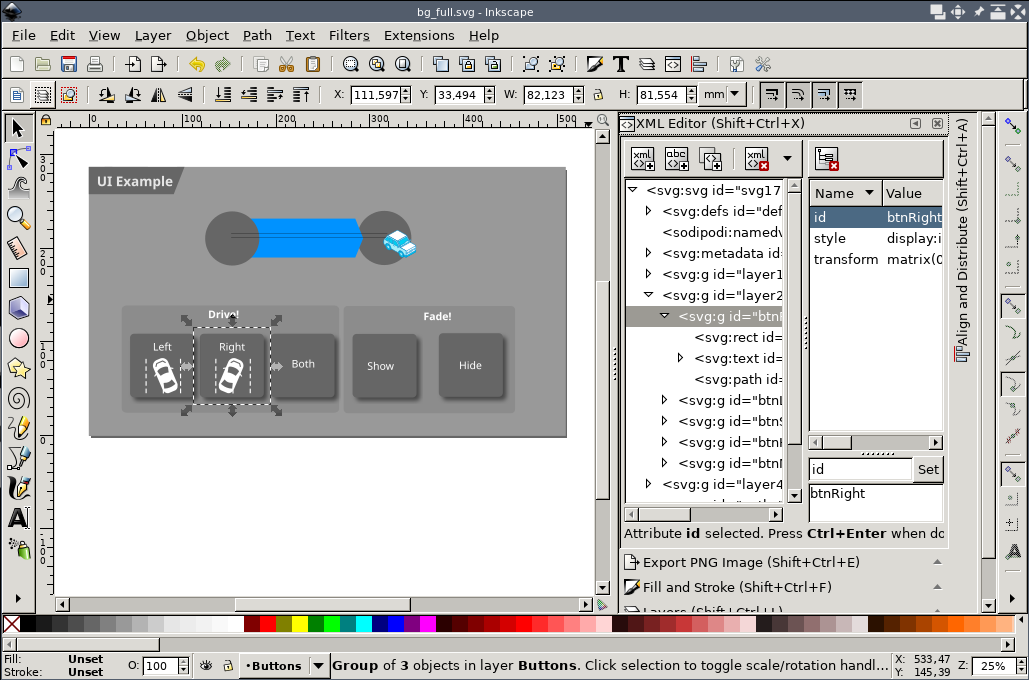
Before displaying, this image needs to be stripped of Inkscape-specific directives, using the scour tool. Then, the SVG image is embedded fullscreen within the HTML page:
<!DOCTYPE html>
<html>
  <head>
    <meta content="width=device-width, initial-scale=1" name="viewport" />
    <meta charset="utf-8"/>
  </head>
  <body>
    <div class="content">
      <object type="image/svg+xml" data="static/bg_stripped.svg" id="bg"></object>
    </div>
  </body>
</html>
and served from a basic webserver. Moreover, the HTML file loads anime.js and jquery.js files from a static directory and our animation library and site-specific main.js file:
    <script src="static/js/jquery-3.6.0.min.js"></script>
    <script src="static/js/anime.min.js"></script>

    <script src="static/js/libanimation.js"></script>
    <script src="static/js/main.js"></script>
Upon loading of the document, we connect the event handlers to the different elements of the SVG using jQuery syntax.
function svgId(id) {
    // Search for the element in the background image and return it.
    return document.getElementById("bg").contentDocument.getElementById(id);
}

$(document).ready(() => {
    // Add some time to let the contained SVG load and render.
    window.setTimeout(function() {
        console.debug("Document loaded!");

        svgId("paths").style.opacity = 0;  // Hide the paths from the SVG

        // Connect Event handlers
        $(svgId("btnShow")).click(btnShow);
        $(svgId("btnLeft")).click(btnLeft);
    }, 500);
});
Animations are created using the Playbook class which is a thin-wrapper around anime.js:
// Create an animation which fades in and out a button.
function animateButton(btnId) {
    new Playbook().pressButton(btnId).play();
}

function btnShow() {
    animateButton("btnShow");
    new Playbook().fadeIn("objCar").play();
}


function btnLeft() {
    animateButton("btnLeft");
    // Let object move along a path within 1000ms
    new Playbook().alongPath("pathRightToLeft", 1000, "objCar").play();
}
The playbook class also supports chaining animations together to yield rather complex animations, like:
    var pb = new Playbook();
    pb.defaultTarget("objCar");
    pb.fadeOut().fadeIn();
    pb.stroke("#00ffff");
    pb.alongPath("pathLeftToRight", 2000);
    pb.fadeOut("objCar", 200).fadeIn("objCar", 200);
    pb.callback(() => { console.log("Callback in between"); });
    pb.alongPath("pathRightToLeft", 500);
    pb.fadeOut().fadeIn();
    pb.stroke("#ff0000");
    pb.onFinished(() => {
        console.log("Complex animation is finished!");
    });
    pb.play();
Using these functions, 90% of the requirements of common UI animations are resolved, with the additional gain, that any layouting can be graphically done within Inkscape. Below is the finished example showing different animations:
Summary
Using the above described technique, we have successfully built two demonstrators and are currently in the process in designing a third. We particularly liked the seamless migration from Inkscape to a Web design, and the relative simplicity of adding basic animations. Using the full power of JavaScript in the background, we can handle click events, perform AJAX requests or add extra HTML overlay elements to make the UI as interactive as needed.